2014年9月27日 星期六

Arduino單元測試:紅外線接收器模組使用測試


首先至github下載IRRemote 函式庫,並加入至 Arduino   Libraries 資料夾底下。

  • 照下表把紅外線接收器跟 Arduino 連接起來:
紅外線接收器接腳 Arduino 接腳
GND (-) 接到 GND
Vcc (+ 或 V+) 接到 +5V 電源
Vout (或 OUT) 接到 pin 2。你可以接到其它 Digital pin,但程式要配合修改

紅外線接收器腳位

紅外線接收器完成
CODE:
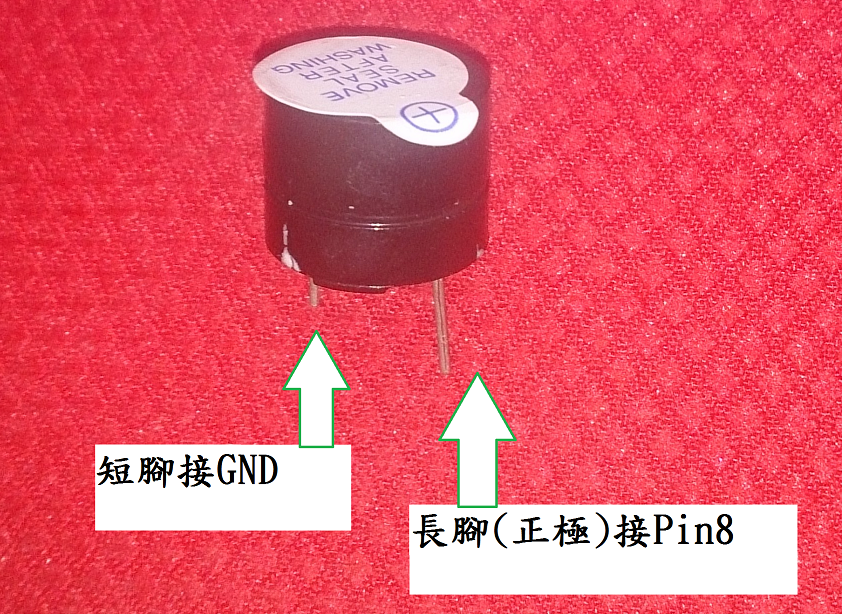
紅外線接收器一旦接收到訊號,蜂鳴器將即時啟動,以利確認紅外線已經接收到了。
#include                     // 引用 IRRemote 函式庫

const int irReceiverPin = 2;             // 紅外線接收器 OUTPUT 訊號接在 pin 2

IRrecv irrecv(irReceiverPin);            // 定義 IRrecv 物件來接收紅外線訊號
decode_results results;                  // 解碼結果將放在 decode_results 結構的 result 變數裏

int Buzzerpin = 3;


void setup()
{
  Serial.begin(9600);                     // 開啟 Serial port, 通訊速率為 9600 bps
  irrecv.enableIRIn();                   // 啟動紅外線解碼
  pinMode(Buzzerpin,OUTPUT); 
  digitalWrite(Buzzerpin,LOW);     //蜂鳴器初始不鳴叫
}


// 顯示紅外線協定種類
void showIRProtocol(decode_results *results) 
{
  Serial.print("Protocol: ");
  
  // 判斷紅外線協定種類
  switch(results->decode_type) {
   case NEC:
     Serial.print("NEC");
     break;
   case SONY:
     Serial.print("SONY");
     break;
   case RC5:
     Serial.print("RC5");
     break;
   case RC6:
     Serial.print("RC6");
     break;
   case DISH:
     Serial.print("DISH");
     break;
   case SHARP:
     Serial.print("SHARP");
     break;
   case PANASONIC:
     Serial.print("PANASONIC");
     break;
   case JVC:
     Serial.print("JVC");
     break;
   case SANYO:
     Serial.print("SANYO");
     break;
   case MITSUBISHI:
     Serial.print("MITSUBISHI");
     break;
   case SAMSUNG:
     Serial.print("SAMSUNG");
     break;
   case LG:
     Serial.print("LG");
     break;
   default:
     Serial.print("Unknown encoding");  
  }  

  // 把紅外線編碼印到 Serial port
  Serial.print("Type: ");
  Serial.print(results->decode_type);
  Serial.print(", irCode: ");            
  Serial.print(results->value, HEX);    // 紅外線編碼
  Serial.print(",  bits: ");           
  Serial.println(results->bits);        // 紅外線編碼位元數    
}

void loop() 
{
  if (irrecv.decode(&results)) {         // 解碼成功,收到一組紅外線訊號
    digitalWrite(Buzzerpin,HIGH);
    delay(10); 
    digitalWrite(Buzzerpin,LOW);
    showIRProtocol(&results);            // 顯示紅外線協定種類
    irrecv.resume();                    // 繼續收下一組紅外線訊號        
  }  
}


參考資料
  1. http://yehnan.blogspot.tw/2013/05/arduino.html
  2. http://coopermaa2nd.blogspot.tw/2011/03/11.html
  3. http://www.takobear.tw/201702608526356260322804024687/-arduino-irremote-homemade

2014年9月13日 星期六

Arduino單元測試:SD卡模組使用

有時候對模組不熟悉時,且模組上沒有標註符號時,往往不清楚要如何接,感謝google讓我們可以找到這網友所分享的經驗,且記錄了microSD 模組和 Arduino 的腳位接法。


SD模組腳位接法

針對SD卡進行讀、寫的測試,如下
Code
#include 

File myFile;

void setup()
{
  Serial.begin(57600);
  pinMode(4, OUTPUT);   // SD模組之CS ->> pin 4
  if (!SD.begin(4)) {
    Serial.println("initialization failed!");
    return;
  }
  Serial.println("initialization done.");
  
  //if (!SD.exists("test")) {
 //   Serial.println("example.txt not exists.");
  //  SD.mkdir("test"); 
  //}
  Serial.println("write test.txt");
   writeFile("test.txt","Arduino Led On");
  readFile( "test.txt");
}
  void loop()
{
  
}
void writeFile( char* filename, char* content) {
  
    myFile = SD.open(filename, FILE_WRITE);
    if (myFile) {
      myFile.println(content);
      myFile.close();
      Serial.println("done..");
    } 
 
}
void readFile( char* filename) {
  // re-open the file for reading:
  myFile = SD.open(filename);
  if (myFile) {
    Serial.println(filename);
    
    // read from the file until there's nothing else in it:
    while (myFile.available()) {
     Serial.write(myFile.read());
    }
    // close the file:
    myFile.close();
  } else {
   // if the file didn't open, print an error:
    Serial.println("error opening file");
  }
}
注意:GND腳位要注意不要接錯。建議接在上圖的位置。

SD卡測試結果


PS:測試透過藍芽將資料紀錄再SD卡,發現程式單元測試沒問題,但接在一起卻沒反應,還不太清楚為什麼。

參考資料
1.http://blog.oscarliang.net/sd-card-arduino/
2.http://gogoprivateryan.blogspot.tw/2014/08/microsd-arduino-microsd.html

2014年9月6日 星期六

Arduino單元測試:測試(無源和有源)蜂鳴器

先說明什麼是有源和無源蜂鳴器,有源和無源這裡的“源”不是指電源,而是指震盪源。也就是說,有源蜂鳴器內部帶震盪源,所以只要一通電就會叫。


  • 無源蜂鳴器

有關pitches.h可至這邊下載
Code(單音節)
#include pitches.h

 // notes in the melody: 
 int melody[] = { 
   NOTE_C5, NOTE_D5, NOTE_E5, NOTE_F5, NOTE_G5, NOTE_A5, NOTE_B5, NOTE_C6}; 
 int duration = 500;  // 500 miliseconds 
   
 void setup() { 
 } 

 void loop() {   
   for (int thisNote = 0; thisNote < 8; thisNote++) { 
     // 在 pin8 上輸出聲音,每個音階響 0.5 秒 
     tone(8, melody[thisNote], duration); 
     // 間隔一段時間後再播放下一個音階 
     delay(1000); 
   } 
   // 兩秒後重新播放  
   delay(2000); 

 } 
Code(超級馬力)
#include pitches.h

// notes in the melody : super mario

    int melodyMario[] = {

    NOTE_E4, NOTE_E4, NOTE_E4, NOTE_C4, NOTE_E4, NOTE_G4, NOTE_G3,  
    NOTE_C4, NOTE_G3, NOTE_E3, NOTE_A3, NOTE_B3, NOTE_AS3, NOTE_A3, NOTE_G3, NOTE_E4, NOTE_G4, NOTE_A4, NOTE_F4, NOTE_G4, NOTE_E4, NOTE_C4, NOTE_D4, NOTE_B3,
    NOTE_C4, NOTE_G3, NOTE_E3, NOTE_A3, NOTE_B3, NOTE_AS3, NOTE_A3, NOTE_G3, NOTE_E4, NOTE_G4, NOTE_A4, NOTE_F4, NOTE_G4, NOTE_E4, NOTE_C4, NOTE_D4, NOTE_B3,
    NOTE_G4, NOTE_FS4, NOTE_E4, NOTE_DS4, NOTE_E4, NOTE_GS3, NOTE_A3, NOTE_C4, NOTE_A3, NOTE_C4, NOTE_D4, NOTE_G4, NOTE_FS4, NOTE_E4, NOTE_DS4, NOTE_E4, NOTE_C5, NOTE_C5, NOTE_C5,
    NOTE_G4, NOTE_FS4, NOTE_E4, NOTE_DS4, NOTE_E4, NOTE_GS3, NOTE_A3, NOTE_C4, NOTE_A3, NOTE_C4, NOTE_D4, NOTE_DS4, NOTE_D4, NOTE_C4,
    NOTE_C4, NOTE_C4, NOTE_C4, NOTE_C4, NOTE_D4, NOTE_E4, NOTE_C4, NOTE_A3, NOTE_G3, NOTE_C4, NOTE_C4, NOTE_C4, NOTE_C4, NOTE_D4, NOTE_E4,
    NOTE_C4, NOTE_C4, NOTE_C4, NOTE_C4, NOTE_D4, NOTE_E4, NOTE_C4, NOTE_A3, NOTE_G3

    };

    // note durations: 4 = quarter note, 8 = eighth note, etc.:

    int noteDurationsMario[] = {
    8,4,4,8,4,2,2,
    3,3,3,4,4,8,4,8,8,8,4,8,4,3,8,8,3,
    3,3,3,4,4,8,4,8,8,8,4,8,4,3,8,8,2,
    8,8,8,4,4,8,8,4,8,8,3,8,8,8,4,4,4,8,2,
    8,8,8,4,4,8,8,4,8,8,3,3,3,1,
    8,4,4,8,4,8,4,8,2,8,4,4,8,4,1,
    8,4,4,8,4,8,4,8,2

    };
   
 void setup() { 
     // iterate over the notes of the melody:
    for (int thisNote = 0; thisNote < 98; thisNote++) {
    // to calculate the note duration, take one second
    // divided by the note type.
    //e.g. quarter note = 1000 / 4, eighth note = 1000/8, etc.
    int noteDuration = 1000/noteDurationsMario[thisNote];
    tone(8, melodyMario[thisNote],noteDuration);


    // to distinguish the notes, set a minimum time between them.
    // the note's duration + 30% seems to work well:
    int pauseBetweenNotes = noteDuration * 1.30;
    delay(pauseBetweenNotes);

    // stop the tone playing:
    noTone(8);
    }
 } 

 void loop() {   
   

 }  

tone()函數說明:
tone(pin, frequency)
tone(pin, frequency, duration)
pin 訊號接口, frequency,頻率,duration間距


無源蜂鳴器接口完成圖
  • 有源蜂鳴器

  • 透過藍芽控制LED和蜂鳴器
我們經由藍芽測試將再LED和蜂鳴器一起控制。
Code
#include pitches.h
SoftwareSerial BTSerial(10, 11); // RX | TX
int Buzzerpin = 3;

void setup()
{
  Serial.begin(57600);
  //pinMode(13, OUTPUT); 
  pinMode(8, OUTPUT); 
  pinMode(Buzzerpin,OUTPUT);   
  digitalWrite(Buzzerpin,LOW);     //蜂鳴器初始為不鳴叫  
  BTSerial.begin(57600);  // HC-06 current bound rate (default 9600)
}
void loop()
{
  // 讀出第 1 個字元 
     unsigned char charreceived = BTSerial.read(); 
     switch(charreceived){ 
      case '1': 
      //digitalWrite(13, HIGH); 
      digitalWrite(8, HIGH);        //啟動LDE
      digitalWrite(Buzzerpin,HIGH); //啟動蜂鳴器
      Serial.println("  Arduino Led On"); 
     // Alarm();
      break; 
      case '0': 
        // digitalWrite(13, LOW); 
         digitalWrite(8, LOW);      //關閉LED
         Serial.println("  Arduino Led Off"); 
        digitalWrite(Buzzerpin,LOW);   ////關閉蜂鳴器
        
         break; 
      default: 
  
         break; 
     }
     Serial.flush(); 
     delay(10); 
}


參考資料
  1. http://yehnan.blogspot.tw/2012/02/arduinoloudspeaker.html
  2. http://coopermaa2nd.blogspot.tw/2010/12/arduino-lab6.html
  3. http://blog.csdn.net/bitezijie/article/details/24815203

Arduino單元測試:Android與Arduino的藍芽通訊 並控制LED


測試透過藍芽通訊協定,傳達指令給 Arduino開關LED,但在這之前我們必須清楚了解我們手邊的藍芽型號是哪一種以及baud rate預設是多少。這的例藍芽型號採HC-06,baud rate改為57600 bps。

  • 確認型號及腳位
       HC-06和Arduino的腳位對應:
  •   跟改藍芽baud rate改,下列為更改為57600 bps,詳細可至下列參考資料查詢。
// A simple sketch to set baud rate of HC-0x bluetooth module 
// If successful configured, a response like "OK75600" will be shown on serial monitor 
// Command: AT+BAUDx, where x can be: 
//    1: 1200, 2:2400, 3:4800, 4:9600, 5:19200,  
//    6:38400, 7:57600, 8:115200, 9:230400 
void setup() 
 { 
  Serial.begin(9600);         // Baud rate of HC-0x bluetooth module 
   delay(6000);  
   Serial.write("AT+BAUD7");   // Set baud rate as 57600 
 } 
 void loop() 
 { 
   if (Serial.available()) 
    Serial.write(Serial.read()); 
 } 

  • 上傳code至Arduino:上傳前記得要將藍芽電源拔除。
#include 
SoftwareSerial BTSerial(10, 11); // RX | TX
void setup()
{
  Serial.begin(57600);
  pinMode(13, OUTPUT); 
  pinMode(8, OUTPUT); 
  BTSerial.begin(57600);  // HC-06 current bound rate (default 57600)
}
void loop()
{
  // 讀出第 1 個字元 
     unsigned char charreceived = BTSerial.read(); 
     switch(charreceived){ 
      case '1':  //開啟LED
      digitalWrite(13, HIGH); 
      digitalWrite(8, HIGH);
      Serial.println("  Arduino Led On"); 
      break; 
      case '0': //關閉LED
         digitalWrite(13, LOW);
         digitalWrite(8, LOW); 
         Serial.println("  Arduino Led Off"); 
         break; 
      default: 
         break; 
     }
     Serial.flush(); 
     delay(10); 
}

  • 將所有線路接至適當地腳位

腳位完成圖

  •  下載安裝 Blueterm
  •  完成影片

PS:把 LED 接到 pin8,長腳(陽極)接到 pin8,短腳(陰極)接到 GND 參考資料
  1. http://www.funbroad.tw/p/maker-single-arduino-android-double_5129.html
  2. http://coopermaa2nd.blogspot.tw/2012/07/config-bluetooth-baud-rate-w-arduino.html 
  3. http://coopermaa2nd.blogspot.tw/2012/09/blueterm-and-arduino.html